0. 前言 Handler 在 Android 开发过程可以说是必不可少的一枚棋,它保证了系统运行过程中的消息有序进行传递和处理。此文将在 Android 6.0 源码层面对 Handler 的运行机制进行简要剖析。
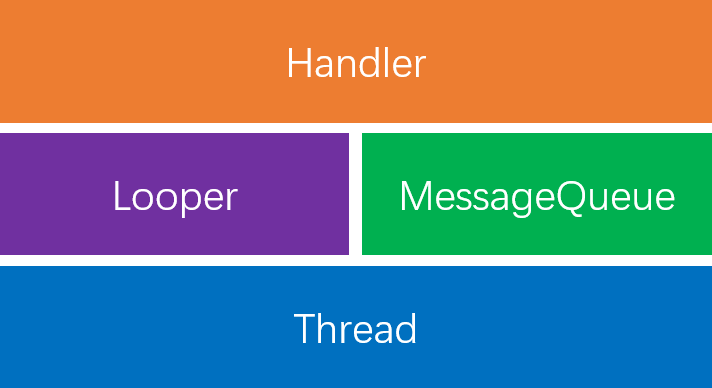
1. 总览 Handler的内部实现主要涉及到这三个类: Thread、MessageQueue和Looper。它们之间的关系可以用如下的图来简单说明:
Thread是最基础的,Looper和MessageQueue都构建在Thread之上,Handler又构建在Looper和MessageQueue之上,我们通过Handler间接地与下面这几个相对底层一点的类打交道。
2. 从投递消息入手 2.1 最小突破口 首先创建Handler对象,来看构造方法:
1 2 3 4 5 6 7 8 9 10 11 12 13 14 15 16 17 18 19 20 21 22 23 24 25 26 27 28 29 30 31 32 33 34 35 36 37 38 39 public Handler () this (null , false ); } public interface Callback public boolean handleMessage (Message msg) } public Handler (Callback callback, boolean async) if (FIND_POTENTIAL_LEAKS) { final Class<? extends Handler> klass = getClass(); if ((klass.isAnonymousClass() || klass.isMemberClass() || klass.isLocalClass()) && (klass.getModifiers() & Modifier.STATIC) == 0 ) { Log.w(TAG, "The following Handler class should be static or leaks might occur: " + klass.getCanonicalName()); } } mLooper = Looper.myLooper(); if (mLooper == null ) { throw new RuntimeException( "Can't create handler inside thread that has not called Looper.prepare()" ); } mQueue = mLooper.mQueue; mCallback = callback; mAsynchronous = async; }
然后是投递消息:
1 2 3 4 5 6 7 8 9 10 11 public final boolean sendMessage (Message msg) return sendMessageDelayed(msg, 0 ); } public final boolean sendMessageDelayed (Message msg, long delayMillis) if (delayMillis < 0 ) { delayMillis = 0 ; } return sendMessageAtTime(msg, SystemClock.uptimeMillis() + delayMillis); }
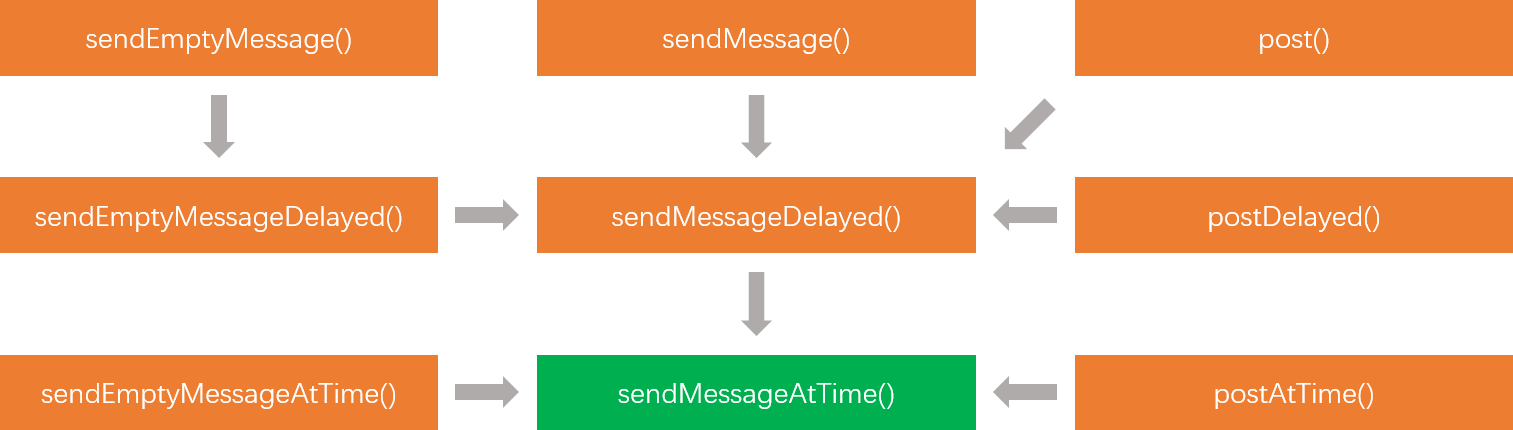
其实,经过观察,多个发送消息的方法其实最终都是调用的一个方法: sendMessageAtTime(...) ,如图所示:
2.2 准备投递 1 2 3 4 5 6 7 8 9 10 11 12 13 public boolean sendMessageAtTime (Message msg, long uptimeMillis) MessageQueue queue = mQueue; if (queue == null ) { RuntimeException e = new RuntimeException( this + " sendMessageAtTime() called with no mQueue" ); Log.w("Looper" , e.getMessage(), e); return false ; } return enqueueMessage(queue, msg, uptimeMillis); }
2.3 包装消息 1 2 3 4 5 6 7 8 9 10 private boolean enqueueMessage (MessageQueue queue, Message msg, long uptimeMillis) msg.target = this ; if (mAsynchronous) { msg.setAsynchronous(true ); } return queue.enqueueMessage(msg, uptimeMillis); }
关于异步
2.4 入消息队列 接下来将目光移向 MessageQueue 的实现。
1 2 3 4 5 6 7 8 9 10 11 12 13 14 15 16 17 18 19 20 21 22 23 24 25 26 27 28 29 30 31 32 33 34 35 36 37 38 39 40 41 42 43 44 45 46 47 48 49 50 51 52 53 54 55 56 57 58 59 60 61 62 63 64 65 66 67 68 69 70 71 72 73 74 75 public final class MessageQueue ... boolean enqueueMessage (Message msg, long when) if (msg.target == null ) { throw new IllegalArgumentException("Message must have a target." ); } if (msg.isInUse()) { throw new IllegalStateException(msg + " This message is already in use." ); } synchronized (this ) { if (mQuitting) { IllegalStateException e = new IllegalStateException( msg.target + " sending message to a Handler on a dead thread" ); Log.w(TAG, e.getMessage(), e); msg.recycle(); return false ; } msg.markInUse(); msg.when = when; Message p = mMessages; boolean needWake; if (p == null || when == 0 || when < p.when) { msg.next = p; mMessages = msg; needWake = mBlocked; } else { needWake = mBlocked && p.target == null && msg.isAsynchronous(); Message prev; for (; ; ) { prev = p; p = p.next; if (p == null || when < p.when) { break ; } if (needWake && p.isAsynchronous()) { needWake = false ; } } msg.next = p; prev.next = msg; } if (needWake) { nativeWake(mPtr); } } return true ; } ... }
至此,消息的入队列过程就完成了,也可以说是消息投递完成了,接下来就是邮递员 Looper 来取消息并且回调收件人 handleMessage() 方法了。
3. 从取消息回看 3.1 用法回顾 在寻找 Looper 的突破口时,我们先来回顾一下 Looper 和 Handler 的配合用法:
1 2 3 4 5 6 7 8 9 10 11 12 13 14 15 16 17 class LooperThread extends Thread public Handler mHandler; public void run () Looper.prepare(); mHandler = new Handler() { public void handleMessage (Message msg) } }; Looper.loop(); } }
可以看到,要使用 Handler ,必先调用 Looper 的相关方法,也就是说我们使用到安卓主线程中,必定在某一个地方悄悄地为我们调用了 Looper 的相关方法,使得我们可以直接使用 Handler 。那么接下来我们就去看看到底在哪里调用了?
3.2 主线程 在主线程 ActivityThread 中,可以找到Main函数,这也是一个应用启动的入口,在主函数中不难发现对 Looper 的相关方法调用:
1 2 3 4 5 6 7 8 9 10 11 12 13 14 15 public final class ActivityThread ... public static void main (String[] args) ... Looper.prepareMainLooper(); if (sMainThreadHandler == null ) { sMainThreadHandler = thread.getHandler(); } Looper.loop(); ... } }
接下来就该对这几行代码分别展开作分析了。
3.3 Looper准备工作 准备分为两种情况,一种是非主线程,一种是主线程。
1 2 3 4 public static void prepare () prepare(true ); }
主线程:
1 2 3 4 5 6 7 8 9 10 11 12 13 14 15 16 17 18 19 20 21 22 23 24 25 26 27 28 29 30 31 32 33 public static void prepareMainLooper () prepare(false ); synchronized (Looper.class) { if (sMainLooper != null ) { throw new IllegalStateException("The main Looper has already been prepared." ); } sMainLooper = myLooper(); } } static final ThreadLocal<Looper> sThreadLocal = new ThreadLocal<Looper>();private static void prepare (boolean quitAllowed) if (sThreadLocal.get() != null ) { throw new RuntimeException("Only one Looper may be created per thread" ); } sThreadLocal.set(new Looper(quitAllowed)); } public static @Nullable Looper myLooper () { return sThreadLocal.get(); }
3.4 Looper循环 Looper 准备好了,就要开始循环取出消息了。
1 2 3 4 5 6 7 8 9 10 11 12 13 14 15 16 17 18 19 20 21 22 23 24 25 26 27 28 29 30 31 32 33 34 35 36 37 38 39 40 41 42 43 44 45 46 47 48 49 50 public static void loop () final Looper me = myLooper(); if (me == null ) { throw new RuntimeException("No Looper; Looper.prepare() wasn't called on this thread." ); } final MessageQueue queue = me.mQueue; Binder.clearCallingIdentity(); final long ident = Binder.clearCallingIdentity(); for (;;) { Message msg = queue.next(); if (msg == null ) { return ; } Printer logging = me.mLogging; if (logging != null ) { logging.println(">>>>> Dispatching to " + msg.target + " " + msg.callback + ": " + msg.what); } msg.target.dispatchMessage(msg); if (logging != null ) { logging.println("<<<<< Finished to " + msg.target + " " + msg.callback); } final long newIdent = Binder.clearCallingIdentity(); if (ident != newIdent) { Log.wtf(TAG, "Thread identity changed from 0x" + Long.toHexString(ident) + " to 0x" + Long.toHexString(newIdent) + " while dispatching to " + msg.target.getClass().getName() + " " + msg.callback + " what=" + msg.what); } msg.recycleUnchecked(); } }
这里读者可能会有疑惑,既然loop()方法中包含死循环,那程序执行到调用loop()不就卡住了,不会执行后续语句啊?对,没错,所以Looper.loop()方法,是ActivityThread主方法中的最后一条语句啊:
1 2 3 4 5 6 7 8 9 public final class ActivityThread ... public static void main (String[] args) ... Looper.loop(); throw new RuntimeException("Main thread loop unexpectedly exited" ); } }
最后,再对消息的分发作分析:
1 2 3 4 5 6 7 8 9 10 11 12 13 14 15 16 17 18 public class Handler ... public void dispatchMessage (Message msg) if (msg.callback != null ) { handleCallback(msg); } else { if (mCallback != null ) { if (mCallback.handleMessage(msg)) { return ; } } handleMessage(msg); } } }
这样的话,当消息触发后就发生回调,回调完成后消息被释放,一次消息传递之旅就圆满完成了。
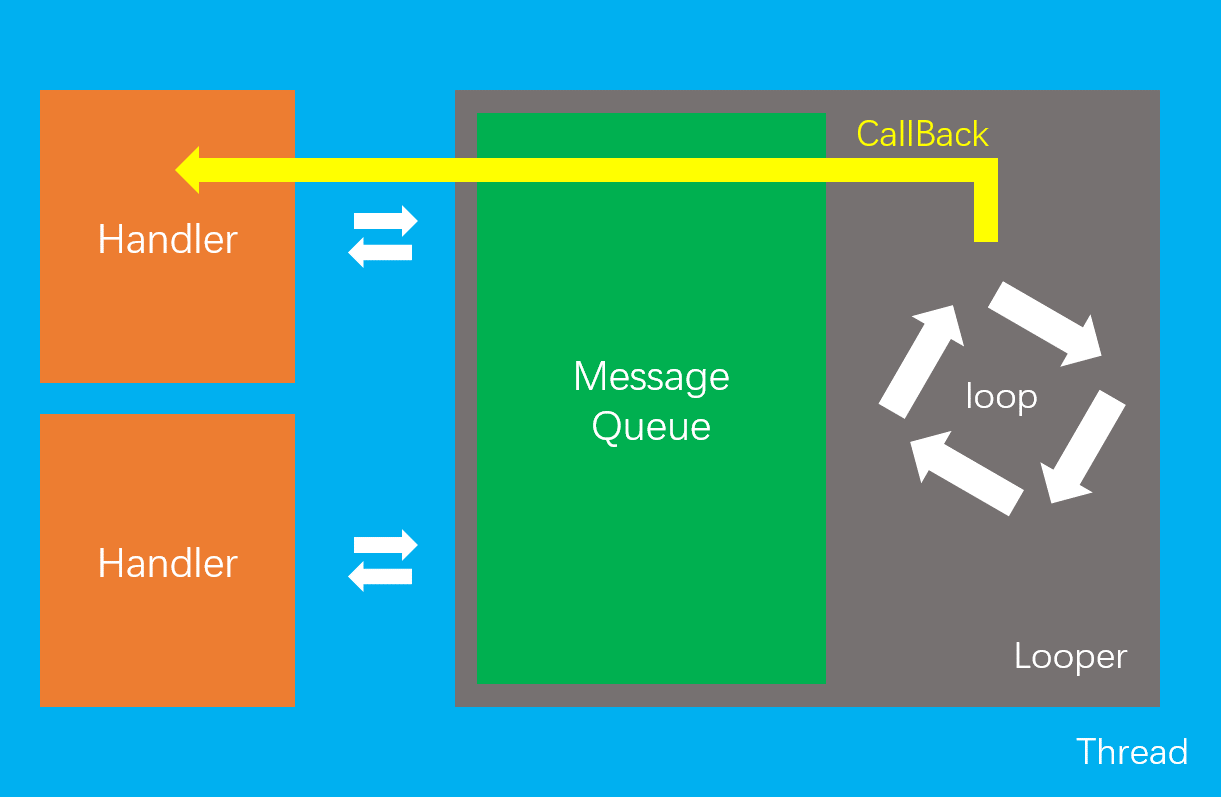
总结 最后的总结,我想用一张图片来表达我对 Handler 机制的理解, THread 中包含多个 Handler 和一个 Looper , Looper 中有一个消息队列,里面保存着需要触发的消息,每个消息包含了投递该消息的 Handler 对象, Looper 中的 loop() 方法循环取出消息,并回调 Handler ,这就是 Handler 机制的工作流程。希望笔者的文章对大家有所帮助,也祝大家学习进步!
参考
深入源码解析Android中的Handler,Message,MessageQueue,Looper 《Android开发艺术探索》 任玉刚