0. 前言 ARouter 是 Android 平台中对页面、服务提供路由功能的中间件,由阿里开发并在 Github 开源 ,主要应用场景如下:
从外部URL映射到内部页面,以及参数传递与解析
跨模块页面跳转,模块间解耦
拦截跳转过程,处理登陆、埋点等逻辑
跨模块API调用,通过控制反转来做组件解耦
本文将对 ARouter 的源码进行分析,学习该路由库的设计思想。
1. 从用法谈起 想要分析 ARouter,我们先回顾它的用法。ARouter 对外 API 简单易懂,用起来很方便,第一步便是初始化,要尽可能放在最前,即 Application 中:
1
2
3
ARouter.openDebug(); ARouter.init(getApplication());
接下来,通过 @Route 注解标记我们需要路由的界面或服务提供者,并进行跳转:
1 2 3 4 5 6 7 8 @Route (path = "/test/activity2" )public class Test2Activity extends AppCompatActivity ... } ARouter.getInstance().build("/test/activity2" ).navigation();
上面便是最基础的用法,我们还可以使用 @Autowired 注解为它注入 Intent 参数:
1 2 3 4 5 6 @Autowired String key1; ARouter.getInstance().inject(this );
除了这些,还有很多有趣、实用的功能,本文偏重于源码分析,这里就不细讲每一种用法,对用法不熟悉的读者还请自行查阅了解。
接下来,我们围绕用法,来看看源码中是如何实现这些功能的。
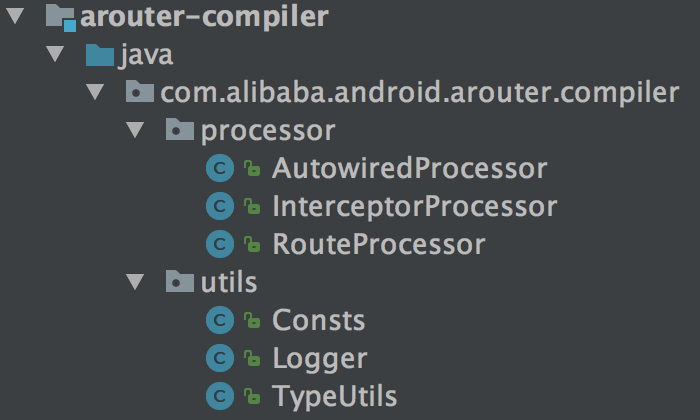
2. 编译期做的事 编译期做的事情和许多框架一样,用到了 APT(注解处理工具)技术,主要是对三种注解:@Route、@Autowired 和 @Interceptor 进行解析,生成相应的处理代码。
图为编译期预处理模块的工程结构,processor 包中为三种注解的处理和代码生成逻辑,其中代码生成也用到的事 JavaPoet 来实现,这里的逻辑没有必要分析,让我们直接来看生成的代码:
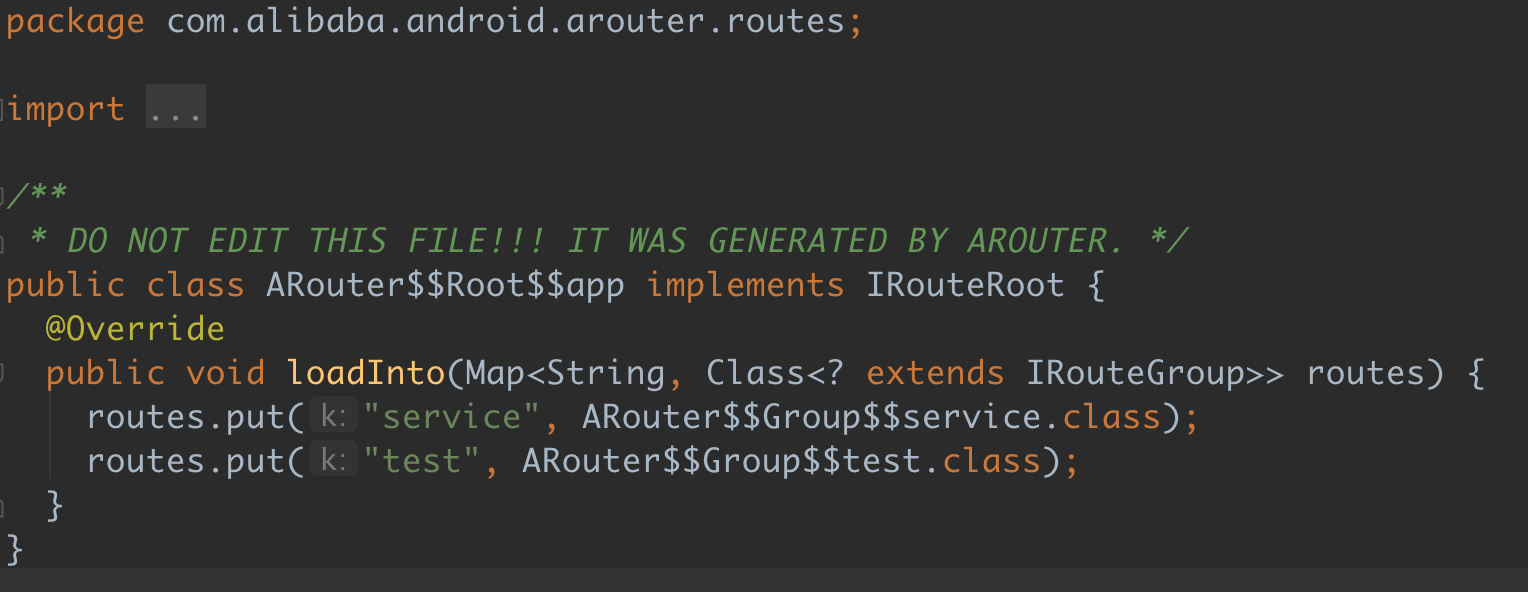
(1)RouteRoot
一个 APP 中会有多个组,每个组内会有多个带有路径 path 的组件。(组名默认为 path 属性的一级划分,如 path『/test/activity1』的组名为『test』)
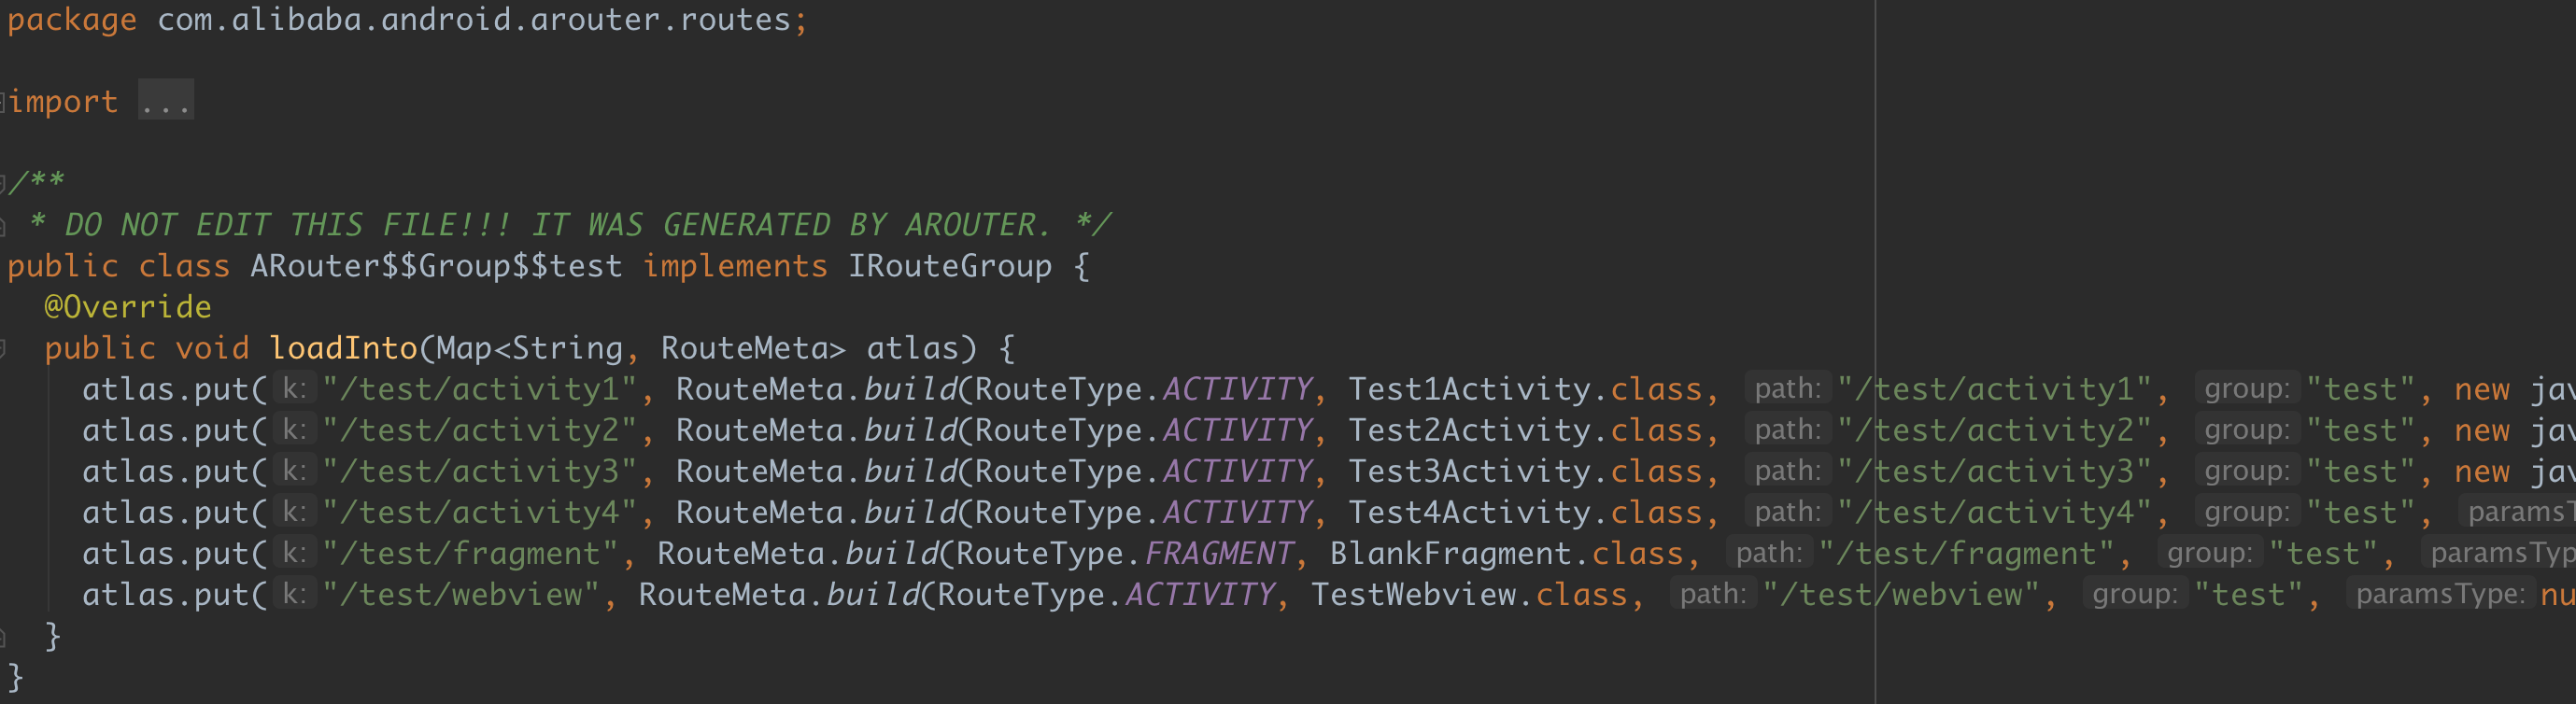
这里是对组的管理,loadInto() 方法可以将组信息加载到参数 routes 中。可以看到 Demo 中包含两个组,『service』和『test』,可以猜测,其关联的两个类便是一个组对组内所有路径组件的管理:
其中,RouteMeta 是对路由信息存储的容器类:
1
2
3
4
5
6
7
8
9
10
11
public class RouteMeta private RouteType type; private Element rawType; private Class<?> destination; private String path; private String group; private int priority = -1 ; private int extra; private Map<String, Integer> paramsType; ... }
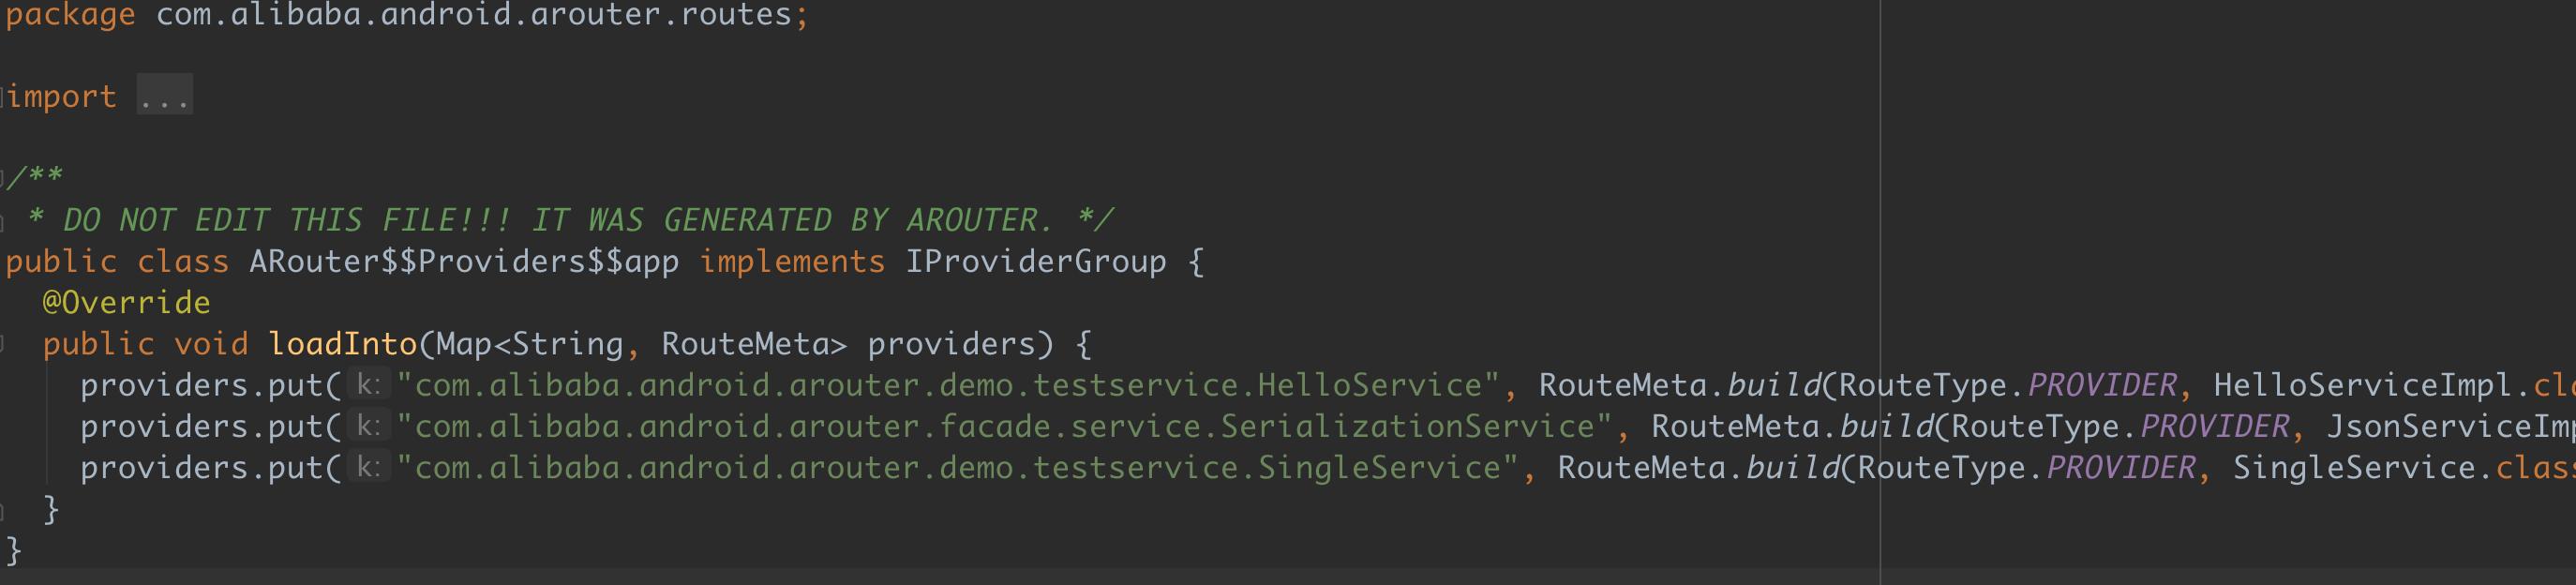
(2)ProviderGroup
ARouter 中有一个概念就是 Provider(服务提供者),Provider 就是用来提供服务的,比如 ARouter 的一些内部功能类或是拦截器,都属于 Provider。
Provider 和 Activity 组件一样都可以被路由,只是 Provider 返回的只是一个初始化后的实例,因为它不能像 Activity 一样有跳转事件。
这里的 ProviderGroup 很明显便是对这些提供者的加载管理,它关联了全类名和 RouteMeta 路由信息。
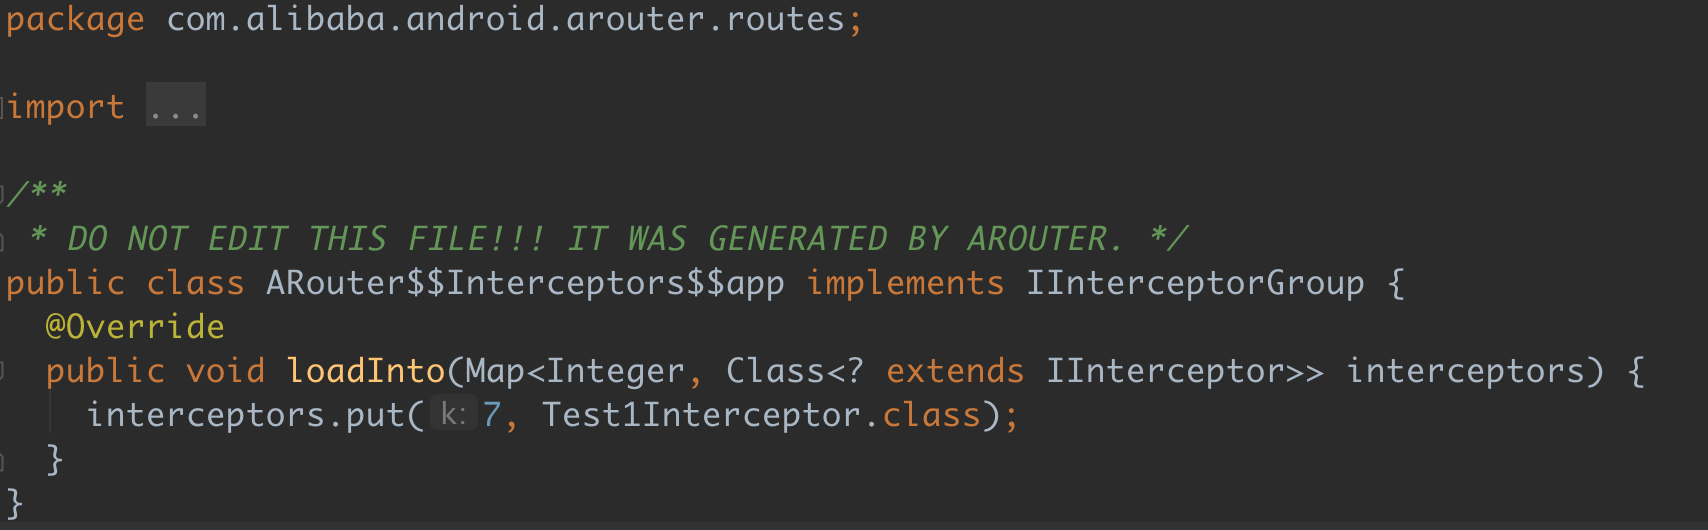
(3)InterceptorGroup
拦截器主要用来拦截路由跳转过程,当中可以进行如登录判断的操作,便于逻辑层面的简化。
此处 InterceptorGroup 便是对拦截器的加载管理,它关联的是拦截器优先级和拦截器实现类。
(4)Autowired
不要忘记还会生成注入类,inject() 方法将 target(即目标组件)中的成员变量依次进行赋值注入。
编译期做的事情主要便是生成上述的几个类,接下来开始正式顺着运行流程对 ARouter 进行分析。
3. 初始化起点 没有多余的配置,ARouter 的初始化只需一行代码即可,来看看做了什么:
1 2 3 4 5 6 7 8 9 10 11 12 13 14 15 16 17 18 public static void init (Application application) if (!hasInit) { logger = _ARouter.logger; _ARouter.logger.info(Consts.TAG, "ARouter init start." ); hasInit = _ARouter.init(application); if (hasInit) { _ARouter.afterInit(); } _ARouter.logger.info(Consts.TAG, "ARouter init over." ); } }
可见,真正的操作都在 _ARouter 中,并且 _ARouter 中都是静态方法,进入到 _ARouter:
1 2 3 4 5 6 7 8 9 10 protected static synchronized boolean init (Application application) mContext = application; LogisticsCenter.init(mContext, executor); logger.info(Consts.TAG, "ARouter init success!" ); hasInit = true ; return true ; }
这里调用的是 LogisticsCenter 中的方法进行初始化,LogisticsCenter 中才是 ARouter 的真正核心逻辑处理:
1 2 3 4 5 6 7 8 9 10 11 12 13 14 15 16 17 18 19 20 21 22 23 24 25 26 27 28 29 30 31 32 33 34 35 36 37 38 39 40 41 42 43 44 45 46 47 48 49 50 51 52 53 54 55 56 57 58 public synchronized static void init (Context context, ThreadPoolExecutor tpe) throws HandlerException mContext = context; executor = tpe; try { long startInit = System.currentTimeMillis(); loadRouterMap(); if (registerByPlugin) { logger.info(TAG, "Load router map by arouter-auto-register plugin." ); } else { Set<String> routerMap; if (ARouter.debuggable() || PackageUtils.isNewVersion(context)) { routerMap = ClassUtils.getFileNameByPackageName(mContext, ROUTE_ROOT_PAKCAGE); if (!routerMap.isEmpty()) { context.getSharedPreferences(AROUTER_SP_CACHE_KEY, Context.MODE_PRIVATE).edit().putStringSet(AROUTER_SP_KEY_MAP, routerMap).apply(); } PackageUtils.updateVersion(context); } else { logger.info(TAG, "Load router map from cache." ); routerMap = new HashSet<>(context.getSharedPreferences(AROUTER_SP_CACHE_KEY, Context.MODE_PRIVATE).getStringSet(AROUTER_SP_KEY_MAP, new HashSet<String>())); } ... for (String className : routerMap) { if (className.startsWith(ROUTE_ROOT_PAKCAGE + DOT + SDK_NAME + SEPARATOR + SUFFIX_ROOT)) { ((IRouteRoot) (Class.forName(className).getConstructor().newInstance())).loadInto(Warehouse.groupsIndex); } else if (className.startsWith(ROUTE_ROOT_PAKCAGE + DOT + SDK_NAME + SEPARATOR + SUFFIX_INTERCEPTORS)) { ((IInterceptorGroup) (Class.forName(className).getConstructor().newInstance())).loadInto(Warehouse.interceptorsIndex); } else if (className.startsWith(ROUTE_ROOT_PAKCAGE + DOT + SDK_NAME + SEPARATOR + SUFFIX_PROVIDERS)) { ((IProviderGroup) (Class.forName(className).getConstructor().newInstance())).loadInto(Warehouse.providersIndex); } } } ... } catch (Exception e) { ... } }
PS:这里讲一个 Android Studio 中去除代码缩进的技巧,就是选中代码块然后 Shift + Tab 键同时按,便可去除缩进(直接按 Tab 键是增加缩进),这个技巧在写博客复制无缩进的代码是挺有用的。
LogisticsCenter 中初始化方法做的事情看起来很复杂,其实很容易,就是将我们在编译期生成的 InterceptorGroup 、ProviderGroup 和 RouteRoot 实例化,然后调用它们的 loadInto() 方法,将它们管理的拦截器、提供者、路由组件信息加载到 Warehouse 类中进行缓存,看看 Warehouse 缓存类:
1
2
3
4
5
6
7
8
9
10
11
12
13
14
15
16
17
18
19
20
21
22
23
24
25
class Warehouse static Map<String, Class<? extends IRouteGroup>> groupsIndex = new HashMap<>(); static Map<String, RouteMeta> routes = new HashMap<>(); static Map<Class, IProvider> providers = new HashMap<>(); static Map<String, RouteMeta> providersIndex = new HashMap<>(); static Map<Integer, Class<? extends IInterceptor>> interceptorsIndex = new UniqueKeyTreeMap<>("More than one interceptors use same priority [%s]" ); static List<IInterceptor> interceptors = new ArrayList<>(); static void clear () routes.clear(); groupsIndex.clear(); ... } }
Warehouse 的用途就是缓存这些路由信息,供全局查询。这里分析了 _ARouter 中的初始化,回过头来,还得看看 _ARouter.afterInit() 的补充流程:
1
2
3
4
static void afterInit () interceptorService = (InterceptorService) ARouter.getInstance().build("/arouter/service/interceptor" ).navigation(); }
初始化后,ARouter 就可以用了,这里拦截器便使用自己的『Provider』功能来完成自己的内部 InterceptorServiceImpl 的实例化,稍后的『跳转』分析中可以看到 Provider 实例化的工作流程。
4. 如何实现的跳转 跳转的用法分两步走,build 和 navigation,如下所示:
1
2
3
ARouter.getInstance() .build("/test/activity2" ) .navigation();
同上文,build() 方法也是在 _ARouter 类中实现:
1 2 3 4 5 6 7 8 9 10 11 12 13 14 15 protected Postcard build (String path) if (TextUtils.isEmpty(path)) { throw new HandlerException(Consts.TAG + "Parameter is invalid!" ); } else { PathReplaceService pService = ARouter.getInstance().navigation(PathReplaceService.class); if (null != pService) { path = pService.forString(path); } return build(path, extractGroup(path)); } }
首先实例化 PathReplaceService 的实现类,PathReplaceService 用于将指定的路径进行拦截后做一个全局修改,类似于 URL 中对相对 URL 进行拦截后修改为绝对 URL,看下 PathReplaceService 的定义:
1
2
3
4
public interface PathReplaceService extends IProvider String forString (String path) ; Uri forUri (Uri uri) ; }
当然,这里不需要进行替换,没有实现类,所以直接跳到 return 语句,首先是取得组名:
1 2 3 4 5 6 7 8 9 10 11 12 13 14 15 16 17 18 19 private String extractGroup (String path) ... try { String defaultGroup = path.substring(1 , path.indexOf("/" , 1 )); if (TextUtils.isEmpty(defaultGroup)) { throw new HandlerException(Consts.TAG + "Extract the default group failed! There's nothing between 2 '/'!" ); } else { return defaultGroup; } } catch (Exception e) { return null ; } }
不指定组名情况下,默认选择路径的一级斜杠,之后进入 build() 重载方法:
1
2
3
4
5
6
7
8
9
10
11
12
13
protected Postcard build (String path, String group) if (TextUtils.isEmpty(path) || TextUtils.isEmpty(group)) { throw new HandlerException(Consts.TAG + "Parameter is invalid!" ); } else { PathReplaceService pService = ARouter.getInstance().navigation(PathReplaceService.class); if (null != pService) { path = pService.forString(path); } return new Postcard(path, group); } }
这里和其重载方法的路径替换操作有些重复,也重复进行了一次路径替换,然后返回 Postcard 的实例,来看看 Postcard 类:
1 2 3 4 5 6 7 8 9 10 11 12 13 14 15 16 17 public final class Postcard extends RouteMeta private Uri uri; private Object tag; private Bundle mBundle; private int flags = -1 ; private int timeout = 300 ; private IProvider provider; private boolean greenChannel; private SerializationService serializationService; private Bundle optionsCompat; private int enterAnim = -1 ; private int exitAnim = -1 ; ... }
可见 Postcard 继承自 RouteMeta(前文已提及类定义),其中存放了路由操作需要的所有信息,这里 build() 方法中 new 实例则是将 path 和 group 属性赋值。
那么还有这么多的其它属性从哪里获得呢,不要忘记之前的初始化操作,初始化操作中调用了编译期生成类的 loadInto() 方法,其加载路由信息到 Warehouse,而这些信息正是 RouteMeta 信息,所以下一步要做的便是从 Warehouse 中取出加载好的 RouteMeta 信息,然后填充到我们的 Postcard 中来,继续分析,验证我们的猜想是否正确。
接下来,第二步便是 navigation 操作,方法定义在 Postcard 中:
1 2 3 4 5 6 7 8 9 10 11 12 13 public Object navigation (Context context, NavigationCallback callback) return ARouter.getInstance().navigation(context, this , -1 , callback); } public Object navigation (Context mContext, Postcard postcard, int requestCode, NavigationCallback callback) return _ARouter.getInstance().navigation(mContext, postcard, requestCode, callback); }
最终还是传递到 _ARouter 中的方法:
1 2 3 4 5 6 7 8 9 10 11 12 13 14 15 16 17 18 19 20 21 22 23 24 25 26 27 28 29 30 31 32 33 34 35 36 37 38 protected Object navigation (final Context context, final Postcard postcard, final int requestCode, final NavigationCallback callback) try { LogisticsCenter.completion(postcard); } catch (NoRouteFoundException ex) { ... } if (null != callback) { callback.onFound(postcard); } if (!postcard.isGreenChannel()) { interceptorService.doInterceptions(postcard, new InterceptorCallback() { @Override public void onContinue (Postcard postcard) _navigation(context, postcard, requestCode, callback); } @Override public void onInterrupt (Throwable exception) if (null != callback) { callback.onInterrupt(postcard); } } }); } else { return _navigation(context, postcard, requestCode, callback); } return null ; }
这里的 navigation() 方法中,首先,如我们猜想,调用了 LogisticsCenter.completion() 方法填充 Postcard 的属性,然后调用拦截器,最后真正的跳转在 _navigation() 方法中。
先来看如何填充 Postcard 的属性,来到 LogisticsCenter.completion() 方法:
1 2 3 4 5 6 7 8 9 10 11 12 13 14 15 16 17 18 19 20 21 22 23 24 25 26 27 28 29 30 31 32 33 34 35 36 37 38 39 40 41 42 43 44 45 46 47 48 49 50 51 52 53 54 55 56 57 58 59 60 61 62 63 64 65 66 67 68 69 70 71 72 73 74 75 76 77 78 79 80 81 82 83 84 85 86 87 88 89 90 public synchronized static void completion (Postcard postcard) ... RouteMeta routeMeta = Warehouse.routes.get(postcard.getPath()); if (null == routeMeta) { Class<? extends IRouteGroup> groupMeta = Warehouse.groupsIndex.get(postcard.getGroup()); if (null == groupMeta) { throw new NoRouteFoundException(TAG + "There is no route match the path [" + postcard.getPath() + "], in group [" + postcard.getGroup() + "]" ); } else { try { ... IRouteGroup iGroupInstance = groupMeta.getConstructor().newInstance(); iGroupInstance.loadInto(Warehouse.routes); Warehouse.groupsIndex.remove(postcard.getGroup()); ... } } catch (Exception e) { throw new HandlerException(TAG + "Fatal exception when loading group meta. [" + e.getMessage() + "]" ); } completion(postcard); } } else { postcard.setDestination(routeMeta.getDestination()); postcard.setType(routeMeta.getType()); postcard.setPriority(routeMeta.getPriority()); postcard.setExtra(routeMeta.getExtra()); Uri rawUri = postcard.getUri(); if (null != rawUri) { Map<String, String> resultMap = TextUtils.splitQueryParameters(rawUri); Map<String, Integer> paramsType = routeMeta.getParamsType(); if (MapUtils.isNotEmpty(paramsType)) { for (Map.Entry<String, Integer> params : paramsType.entrySet()) { setValue(postcard, params.getValue(), params.getKey(), resultMap.get(params.getKey())); } postcard.getExtras().putStringArray(ARouter.AUTO_INJECT, paramsType.keySet().toArray(new String[]{})); } postcard.withString(ARouter.RAW_URI, rawUri.toString()); } switch (routeMeta.getType()) { case PROVIDER: Class<? extends IProvider> providerMeta = (Class<? extends IProvider>) routeMeta.getDestination(); IProvider instance = Warehouse.providers.get(providerMeta); if (null == instance) { IProvider provider; try { provider = providerMeta.getConstructor().newInstance(); provider.init(mContext); Warehouse.providers.put(providerMeta, provider); instance = provider; } catch (Exception e) { throw new HandlerException("Init provider failed! " + e.getMessage()); } } postcard.setProvider(instance); postcard.greenChannel(); break ; case FRAGMENT: postcard.greenChannel(); default : break ; } } }
至此,Postcard 中需要的属性都填充完毕,其中还包含是否为绿色通道的属性,绿色通道将不经过拦截器。接下来看拦截操作的执行:
1
2
3
4
5
6
7
8
9
10
11
12
13
14
15
16
17
18
19
20
21
22
23
24
25
26
27
28
29
30
31
32
33
34
35
36
37
38
39
40
41
42
43
44
45
46
47
48
49
50
51
52
53
54
55
56
57
58
59
60
61
62
63
64
65
66
67
68
69
70
71
72
73
74
75
76
77
78
79
80
81
82
83
84
85
86
87
88
89
90
91
92
93
94
95
96
97
98
99
100
101
102
103
104
105
106
107
108
109
110
111
112
@Route (path = "/arouter/service/interceptor" )public class InterceptorServiceImpl implements InterceptorService private static boolean interceptorHasInit; private static final Object interceptorInitLock = new Object(); @Override public void doInterceptions (final Postcard postcard, final InterceptorCallback callback) if (null != Warehouse.interceptors && Warehouse.interceptors.size() > 0 ) { checkInterceptorsInitStatus(); if (!interceptorHasInit) { callback.onInterrupt(new HandlerException("Interceptors initialization takes too much time." )); return ; } LogisticsCenter.executor.execute(new Runnable() { @Override public void run () CancelableCountDownLatch interceptorCounter = new CancelableCountDownLatch(Warehouse.interceptors.size()); try { _excute(0 , interceptorCounter, postcard); interceptorCounter.await(postcard.getTimeout(), TimeUnit.SECONDS); if (interceptorCounter.getCount() > 0 ) { callback.onInterrupt(new HandlerException("The interceptor processing timed out." )); } else if (null != postcard.getTag()) { callback.onInterrupt(new HandlerException(postcard.getTag().toString())); } else { callback.onContinue(postcard); } } catch (Exception e) { callback.onInterrupt(e); } } }); } else { callback.onContinue(postcard); } } private static void _excute (final int index, final CancelableCountDownLatch counter, final Postcard postcard) if (index < Warehouse.interceptors.size()) { IInterceptor iInterceptor = Warehouse.interceptors.get(index); iInterceptor.process(postcard, new InterceptorCallback() { @Override public void onContinue (Postcard postcard) counter.countDown(); _excute(index + 1 , counter, postcard); } @Override public void onInterrupt (Throwable exception) postcard.setTag(null == exception ? new HandlerException("No message." ) : exception.getMessage()); counter.cancel(); } }); } } @Override public void init (final Context context) LogisticsCenter.executor.execute(new Runnable() { @Override public void run () if (MapUtils.isNotEmpty(Warehouse.interceptorsIndex)) { for (Map.Entry<Integer, Class<? extends IInterceptor>> entry : Warehouse.interceptorsIndex.entrySet()) { Class<? extends IInterceptor> interceptorClass = entry.getValue(); try { IInterceptor iInterceptor = interceptorClass.getConstructor().newInstance(); iInterceptor.init(context); Warehouse.interceptors.add(iInterceptor); } catch (Exception ex) { throw new HandlerException(TAG + "ARouter init interceptor error! name = [" + interceptorClass.getName() + "], reason = [" + ex.getMessage() + "]" ); } } interceptorHasInit = true ; logger.info(TAG, "ARouter interceptors init over." ); synchronized (interceptorInitLock) { interceptorInitLock.notifyAll(); } } } }); } private static void checkInterceptorsInitStatus () synchronized (interceptorInitLock) { while (!interceptorHasInit) { try { interceptorInitLock.wait(10 * 1000 ); } catch (InterruptedException e) { throw new HandlerException(TAG + "Interceptor init cost too much time error! reason = [" + e.getMessage() + "]" ); } } } } }
InterceptorServiceImpl 会将所有标记 @Interceptor 的拦截器进行实例化,并在每一次跳转(非绿色通道)时,按优先级顺序执行所有的拦截器。
在所有拦截器都放行通过后,接下来便进入真正的跳转逻辑:
1 2 3 4 5 6 7 8 9 10 11 12 13 14 15 16 17 18 19 20 21 22 23 24 25 26 27 28 29 30 31 32 33 34 35 36 37 38 39 40 41 42 43 44 45 46 47 48 49 50 51 52 53 54 55 56 57 58 59 60 61 62 63 64 65 66 67 68 69 70 71 72 73 74 75 private Object _navigation (final Context context, final Postcard postcard, final int requestCode, final NavigationCallback callback) final Context currentContext = null == context ? mContext : context; switch (postcard.getType()) { case ACTIVITY: final Intent intent = new Intent(currentContext, postcard.getDestination()); intent.putExtras(postcard.getExtras()); int flags = postcard.getFlags(); if (-1 != flags) { intent.setFlags(flags); } else if (!(currentContext instanceof Activity)) { intent.setFlags(Intent.FLAG_ACTIVITY_NEW_TASK); } new Handler(Looper.getMainLooper()).post(new Runnable() { @Override public void run () if (requestCode > 0 ) { ActivityCompat.startActivityForResult((Activity) currentContext, intent, requestCode, postcard.getOptionsBundle()); } else { ActivityCompat.startActivity(currentContext, intent, postcard.getOptionsBundle()); } if ((-1 != postcard.getEnterAnim() && -1 != postcard.getExitAnim()) && currentContext instanceof Activity) { ((Activity) currentContext).overridePendingTransition(postcard.getEnterAnim(), postcard.getExitAnim()); } if (null != callback) { callback.onArrival(postcard); } } }); break ; case PROVIDER: return postcard.getProvider(); case BOARDCAST: case CONTENT_PROVIDER: case FRAGMENT: Class fragmentMeta = postcard.getDestination(); try { Object instance = fragmentMeta.getConstructor().newInstance(); if (instance instanceof Fragment) { ((Fragment) instance).setArguments(postcard.getExtras()); } else if (instance instanceof android.support.v4.app.Fragment) { ((android.support.v4.app.Fragment) instance).setArguments(postcard.getExtras()); } return instance; } catch (Exception ex) { logger.error(Consts.TAG, "Fetch fragment instance error, " + TextUtils.formatStackTrace(ex.getStackTrace())); } case METHOD: case SERVICE: default : return null ; } return null ; }
对于 Activity 这类可跳转组件,调用 startActivity() 进行跳转,对于 Provider、Fragment 这类非跳转组件,返回其实例即可。
以上便是 ARouter 的主要功能,接下来再分析一下参数注入的实现。
5. 参数的注入 参数注入需要我们在组件的 onCreate() 方法中调用 inject() 方法,来看看:
1 2 3 4 5 public void inject (Object thiz) _ARouter.inject(thiz); }
再来看 _ARouter 中真正的实现:
1 2 3 4 5 6 7 8 9 10 static void inject (Object thiz) AutowiredService autowiredService = ((AutowiredService) ARouter.getInstance().build("/arouter/service/autowired" ).navigation()); if (null != autowiredService) { autowiredService.autowire(thiz); } }
这里也是用自己的『Provider』功能完成自己的需求,取得的实例是 AutowiredServiceImpl,调用其 autowire() 方法:
1
2
3
4
5
6
7
8
9
10
11
12
13
14
15
16
17
18
19
20
21
22
23
24
25
26
27
28
29
30
31
32
33
34
35
36
37
@Route (path = "/arouter/service/autowired" )public class AutowiredServiceImpl implements AutowiredService private LruCache<String, ISyringe> classCache; private List<String> blackList; @Override public void init (Context context) classCache = new LruCache<>(66 ); blackList = new ArrayList<>(); } @Override public void autowire (Object instance) String className = instance.getClass().getName(); try { if (!blackList.contains(className)) { ISyringe autowiredHelper = classCache.get(className); if (null == autowiredHelper) { autowiredHelper = (ISyringe) Class.forName(instance.getClass().getName() + SUFFIX_AUTOWIRED).getConstructor().newInstance(); } autowiredHelper.inject(instance); classCache.put(className, autowiredHelper); } } catch (Exception ex) { blackList.add(className); } } }
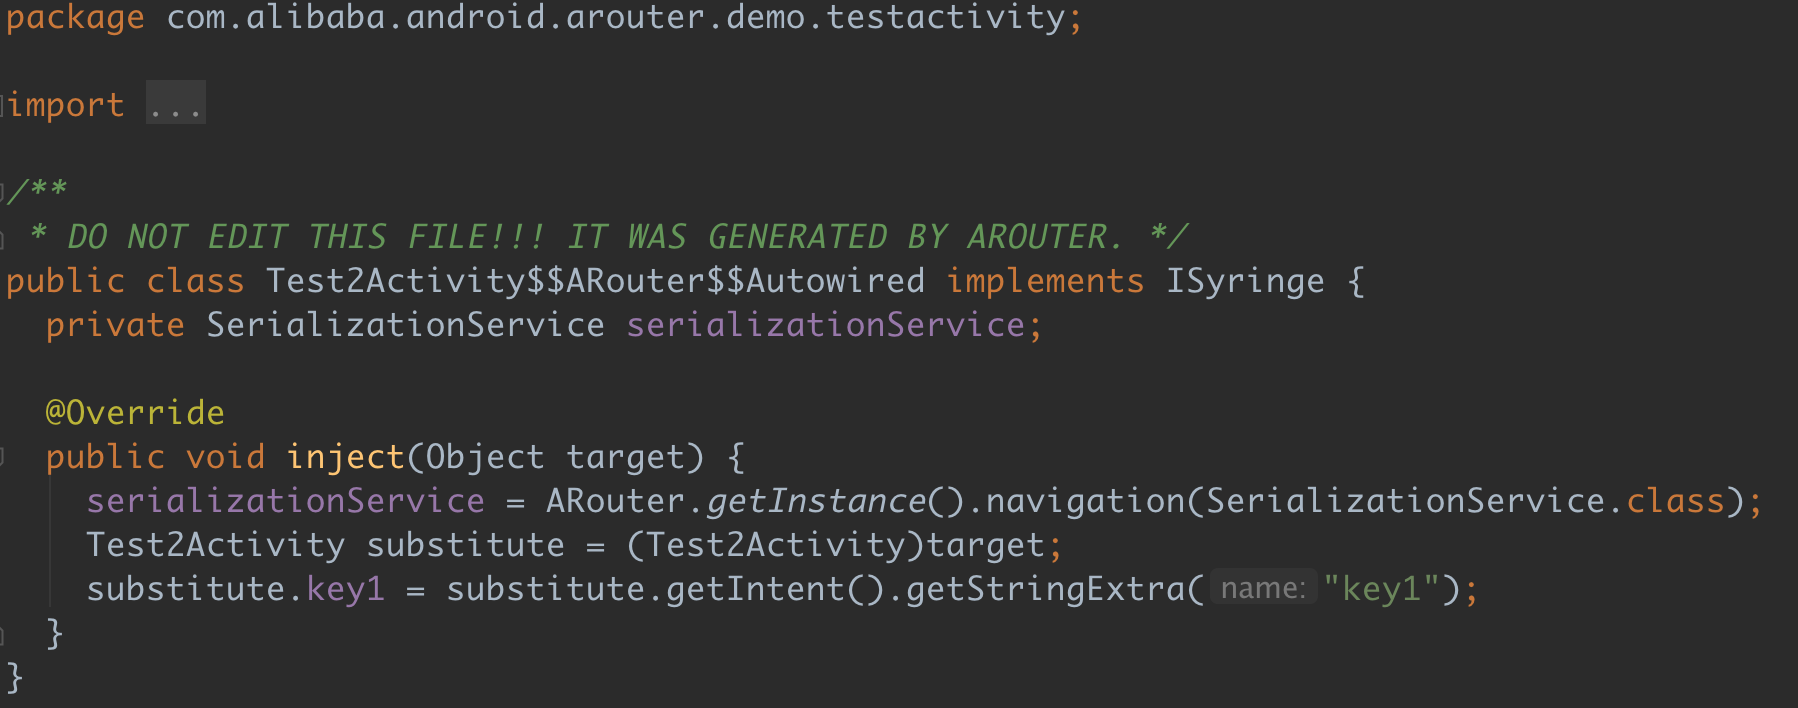
AutowiredServiceImpl 中主要是将编译器生成名为『原类名+$$ARouter$$Autowired』的类实例化,然后调用其 inject() 方法,来看一看生成的类:
1 2 3 4 5 6 7 8 9 10 11 12 13 14 15 16 17 public class Test2Activity $$ARouter $$Autowired implements ISyringe private SerializationService serializationService; @Override public void inject (Object target) serializationService = ARouter.getInstance().navigation(SerializationService.class); Test2Activity substitute = (Test2Activity)target; substitute.key1 = substitute.getIntent().getStringExtra("key1" ); } }
很容易理解,startActivity 时将参数放进了 Intent,这里从 Intent 取出参数,再赋值给包访问权限的组件属性,至此,ARouter 的参数注入也就分析完毕了。
6. 结语 本文围绕 ARouter 的基本用法对其源码进行了简要分析,梳理了组件路由的整个流程。简单来说,ARouter 就是通过 APT 技术在编译期事先生成路由图信息,之后运行期根据路由图信息构造跳转参数和行为,通过拦截器后,在目标组件生命周期开始时注入参数,如此实现简洁的路由功能。